Pattern 1: Prompt Chaining
Build sequential LLM pipelines where each agent's output feeds the next. Learn prompt chaining with Microsoft Agent Framework in C#.
Overview
Learning Objectives
By the end of this tutorial, you will be able to:
- Understand the Prompt Chaining pattern and when to use it
- Create specialized agents using
AgentExecutor - Build sequential workflows with
WorkflowBuilder - Compare multi-agent vs single-agent approaches
- Run benchmarks with cloud (Azure/OpenAI) and local (Ollama) providers
Prerequisites
- .NET 8.0 SDK or later installed
- An LLM provider configured (see Setting Up the Agent Environment)
- Basic familiarity with C# async/await patterns
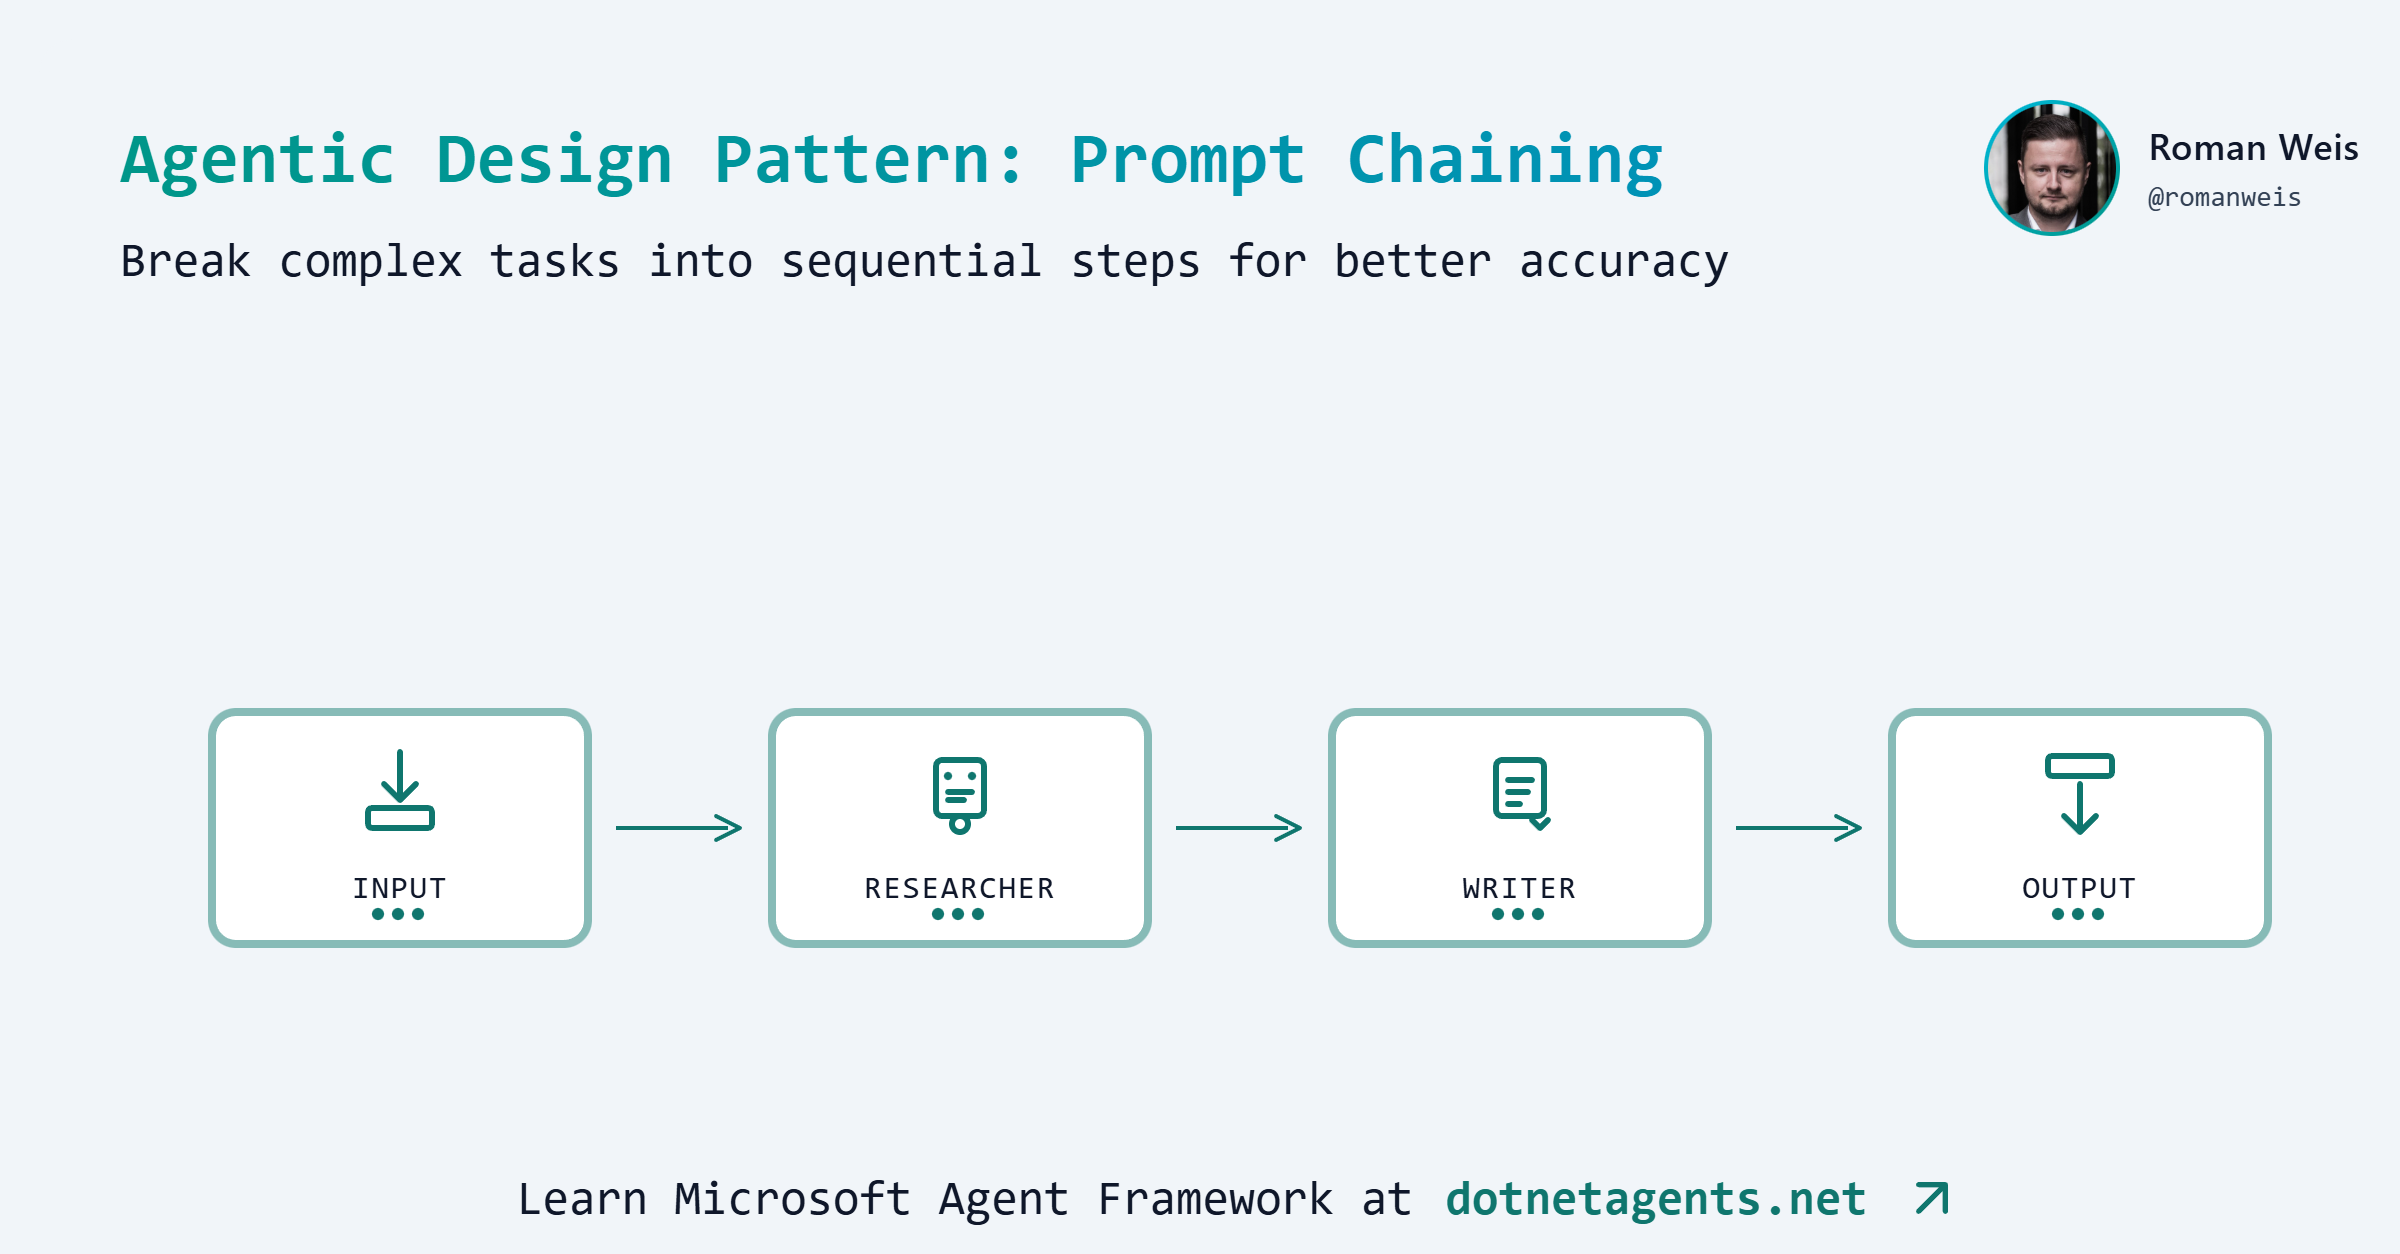
What is Prompt Chaining?
Prompt Chaining is a foundational agentic pattern where multiple LLM calls execute sequentially, with each call’s output becoming the input for the next. Think of it as an assembly line where each station performs a specific task and passes the result forward.
Each agent specializes in one task, making the overall system more reliable and maintainable than a single monolithic prompt.
When to Use Prompt Chaining
Use multi-agent chains when:
- Quality matters more than speed (publications, reports)
- You need evidence, citations, or research depth
- Tasks benefit from specialized expertise at each stage
- Auditability is important (see each step’s output)
Use single-agent approach when:
- Speed is critical
- Cost is a primary concern
- Content is for internal/draft purposes
- The task is straightforward
Real-world examples:
| Use Case | Pipeline Steps |
|---|---|
| Content Creation | Research → Outline → Write → Edit |
| Code Review | Parse → Analyze → Suggest → Report |
| Customer Support | Classify → Research → Draft → Review |
| Data Processing | Extract → Transform → Validate → Load |
Step-by-Step Implementation
Step 1: Clone the Patterns Repository
git clone https://github.com/dotnetagents/patterns.git
cd patterns/01-prompt-chaining/src/PromptChaining
Step 2: Configure Your LLM Provider
Set up your environment variables based on your provider. See Setting Up the Agent Environment for detailed instructions.
For OpenAI:
export OPENAI_API_KEY=sk-...
Step 3: Create Specialized Agents
Each agent has a single responsibility with focused instructions. The patterns repo uses AgentExecutor to create workflow-compatible agents:
Researcher Agent - Gathers key points about the topic:
var researcher = new AgentExecutor(new AgentConfig
{
    Name = "Researcher",
    Provider = "azure",  // or "ollama", "openai", "openrouter"
    Model = "gpt-4.1",
    Instructions = """
        You are a research assistant specializing in gathering and synthesizing information.

        When given a topic:
        1. Identify the main concepts and subtopics
        2. List 3-5 key points that should be covered
        3. Note any important facts, statistics, or examples
        4. Identify the target audience and appropriate tone

        Output format: Structured research notes with clear sections.
        Keep your response concise but comprehensive.
        """
});
Outliner Agent - Creates a structured outline:
var outliner = new AgentExecutor(new AgentConfig
{
    Name = "Outliner",
    Provider = "azure",
    Model = "gpt-4.1",
    Instructions = """
        You are a content strategist who creates clear, logical outlines.

        Based on the research notes provided:
        1. Create a hierarchical outline with main sections and subsections
        2. Include brief descriptions for each section (1-2 sentences)
        3. Suggest an introduction hook and conclusion
        4. Recommend word count per section

        Output format: Numbered outline with clear hierarchy.
        Focus on logical flow and reader engagement.
        """
});
Writer Agent - Produces the final content:
var writer = new AgentExecutor(new AgentConfig
{
    Name = "Writer",
    Provider = "azure",
    Model = "gpt-4.1",
    Instructions = """
        You are a professional content writer who creates engaging, well-structured articles.

        Based on the outline provided:
        1. Write polished content following the outline structure
        2. Use clear, engaging language appropriate for the target audience
        3. Include transitions between sections
        4. Add a compelling introduction and satisfying conclusion

        IMPORTANT: Output ONLY the final article. Do not include the research notes,
        outline, or any previous context in your output.

        Your output should be a complete, polished article with headers and formatted paragraphs.
        """
});
Step 4: Build the Sequential Workflow
Chain the agents together using WorkflowBuilder:
var workflow = new WorkflowBuilder(researcher)
    .AddEdge(researcher, outliner)
    .AddEdge(outliner, writer)
    .Build();
This creates a workflow where:
- The user’s input goes to the Researcher
- The Researcher’s output goes to the Outliner
- The Outliner’s output goes to the Writer
- The Writer produces the final result
Step 5: Create the Benchmark Class
The patterns repo uses benchmark attributes to define and run workflows. Create a benchmark class with the prompt defined at the class level:
[WorkflowBenchmark("prompt-chaining",
    Prompt = "The benefits of test-driven development in software engineering",
    Description = "Content generation with prompt chaining")]
public class PromptChainingBenchmarks
{
    [BenchmarkLlm("multi-agent", Description = "3-agent pipeline: Researcher -> Outliner -> Writer")]
    public async Task<BenchmarkOutput> MultiAgent(string prompt)
    {
        var (workflow, agentModels) = MultiAgentContentPipeline.Create(
            new MultiAgentContentPipelineConfig
            {
                ResearcherModel = "gpt-4.1",
                OutlinerModel = "gpt-4.1",
                WriterModel = "gpt-4.1",
            }
        );

        var content = await WorkflowRunner.RunAsync(workflow, prompt);
        return BenchmarkOutput.WithModels(content, agentModels);
    }
}
Key elements:
[WorkflowBenchmark]on the class defines the benchmark group and thePromptto use[BenchmarkLlm]on each method marks it as a benchmark variant- The
promptparameter is automatically injected from the class attribute BenchmarkOutput.WithModels()returns the result along with model metadata for reporting
Multi-Agent vs Single-Agent Comparison
A key question: Is the complexity of multiple agents worth it?
The patterns repo includes both approaches for comparison:
Single-Agent Approach (Baseline)
var writer = new AgentExecutor(new AgentConfig
{
    Name = "CombinedContentAgent",
    Provider = "azure",
    Model = "gpt-4.1",
    Instructions = """
        You are a professional content writer who creates engaging, well-structured articles.

        When given a topic, follow these steps internally:

        ## Step 1: Research
        - Identify the main concepts and subtopics
        - List 3-5 key points that should be covered
        - Note any important facts, statistics, or examples
        - Identify the target audience and appropriate tone

        ## Step 2: Outline
        - Create a hierarchical outline with main sections and subsections
        - Include brief descriptions for each section (1-2 sentences)
        - Suggest an introduction hook and conclusion
        - Recommend word count per section
        - Focus on logical flow and reader engagement

        ## Step 3: Write
        - Write polished content following the outline structure
        - Use clear, engaging language appropriate for the target audience
        - Include transitions between sections
        - Add a compelling introduction and satisfying conclusion

        IMPORTANT: Output ONLY the final article. Do not include the research notes,
        outline, or any previous context in your output.

        Your output should be a complete, polished article with headers and formatted paragraphs.
        Maintain consistent tone throughout.
        """
});
The single-agent approach combines all steps into one prompt with detailed instructions, relying on the model to internally perform research, outlining, and writing.
Benchmark Results
1. Single GPT-4.1 Agent vs 3 GPT-4.1 Agents
How the Benchmark Was Run
The benchmark was executed using the BenchmarkLlm framework included in the patterns repository:
cd patterns/01-prompt-chaining/src/PromptChaining
dotnet run -- --benchmark --evaluate
This command:
- Runs both
single-agentandmulti-agentbenchmarks with the configured prompt - Collects metrics (tokens, latency, API calls) via
MetricsCollectingChatClient - Saves outputs to
runs/<timestamp>/prompt-chaining/<benchmark-name>/output.md - Evaluates quality using LLM-as-Judge (gpt-4o scores content on 8 dimensions)
- Generates
results.jsonwith all metrics and quality scores
Benchmark Configuration
Prompt: "The benefits of test-driven development in software engineering"
| Configuration | Provider | Model | Agents | Description |
|---|---|---|---|---|
single-agent | Azure OpenAI | gpt-4.1 | 1 | CombinedContentAgent with research/outline/write steps in one prompt |
multi-agent | Azure OpenAI | gpt-4.1 | 3 | Researcher → Outliner → Writer pipeline |
Environment:
- Runtime: .NET 10.0.1
- Evaluation Model: gpt-4o (LLM-as-Judge with 8-dimension rubric)
Results Summary
| Benchmark | LLM Calls | Tokens | Latency | Quality Score |
|---|---|---|---|---|
| single-agent (baseline) | 1 | 1,029 | 8.7s | 3.63/5 |
| multi-agent | 3 | 3,774 | 24.8s | 4.75/5 |
Token Breakdown:
| Benchmark | Input Tokens | Output Tokens | Total |
|---|---|---|---|
| single-agent | 238 | 791 | 1,029 |
| multi-agent | 1,450 | 2,324 | 3,774 |
Quality Breakdown (1-5 scale)
| Dimension | single-agent | multi-agent | Delta |
|---|---|---|---|
| Completeness | 4 | 5 | +1 |
| Structure | 5 | 5 | 0 |
| Accuracy | 5 | 5 | 0 |
| Engagement | 4 | 5 | +1 |
| Evidence | 2 | 5 | +3 |
| Balance | 3 | 5 | +2 |
| Actionability | 2 | 3 | +1 |
| Depth | 4 | 5 | +1 |
| Average | 3.63 | 4.75 | +1.12 |
Key Findings
Multi-agent pipeline delivers +31% higher quality scores:
- Evidence Quality jumps from 2→5: Cites specific research (IBM 40% bug reduction, Microsoft 60-90% fewer defects)
- Balance improves from 3→5: Covers both benefits AND challenges/limitations of TDD
- Completeness and Engagement reach perfect 5s with richer, more comprehensive content
Trade-offs:
- Multi-agent uses 3.7× more tokens (3,774 vs 1,029)
- Multi-agent takes 2.8× longer (24.8s vs 8.7s)
- ROI: +31% quality for 3.7× token cost
Generated Outputs
Single Agent Output (791 tokens, 3.63/5 quality)
The Benefits of Test-Driven Development in Software Engineering
In the fast-paced world of software engineering, where product quality and development speed are paramount, methodologies that support robust, maintainable code are essential. Test-driven development (TDD) is one such approach, widely embraced by agile teams and forward-thinking developers. By prioritizing tests before the actual code, TDD streamlines the development process and cultivates a disciplined engineering culture. But what are the real benefits of test-driven development, and why should software teams consider making it a core part of their workflow?
Understanding Test-Driven Development
Test-driven development flips traditional programming on its head. Rather than writing code first and testing afterward, TDD requires developers to begin by writing well-defined tests for a feature or module. Only after these tests are established does the coding process begin. The cycle is clear: write a failing test, write the minimum code necessary to make the test pass, and then refactor the code while ensuring that all tests continue to succeed.
Enhanced Code Quality and Reliability
One of TDD’s most profound benefits is the notable improvement in code quality. Because tests guide the development process, developers are more likely to write clean, modular, and loosely-coupled code. Each functional unit is accompanied by a corresponding test, ensuring that every piece operates as expected.
Furthermore, TDD reduces the likelihood of bugs surfacing late in the development cycle. As new features or changes are introduced, previously written tests provide a safety net, immediately catching regressions and preventing unintentional disruptions. This test-first mindset builds reliability into every layer of the codebase.
Faster and Safer Refactoring
Software inevitably evolves. Whether adapting to new requirements or optimizing existing features, code often needs to be refactored. TDD empowers developers to refactor with confidence. Since a comprehensive test suite is already in place, engineers can make changes knowing that any breakage will be quickly spotted.
This streamlines the refactoring process, eliminates the fear of hidden side effects, and encourages a culture where continuous improvement is not only possible but also practical.
Lower Long-term Maintenance Costs
While TDD may seem time-intensive upfront, it usually results in lower maintenance costs over the long haul. Well-tested code is easier to understand, debug, and extend. New developers onboarding into the project can use existing tests to grasp the system’s behavior, while legacy issues are minimized thanks to predictable, documented functionality.
Additionally, TDD helps in documenting the intended use of each part of the system through test cases, reducing the reliance on extensive external documentation and making it easier to identify if something is broken or out of sync.
Improved Design and Requirements Clarity
The discipline of writing tests before implementation forces developers to clarify requirements and edge cases from the outset. TDD compels teams to break complex features into smaller, testable units, resulting in better-architected solutions. It becomes easier to identify ambiguities and potential issues early, reducing miscommunication between developers, testers, and stakeholders.
Moreover, TDD can bridge gaps between technical and non-technical team members, as tests serve as executable specifications. This alignment ensures that what gets built matches what was intended.
Boosted Developer Confidence and Productivity
TDD doesn’t just benefit the software—it benefits the people creating it. Developers report increased satisfaction and confidence when working with well-tested code. Frequent feedback loops keep progress visible and issues manageable. As a result, teams often deliver software more quickly, with higher morale and reduced stress.
Conclusion
Test-driven development is more than just a testing technique; it’s a philosophy that places quality, clarity, and confidence at the heart of software engineering. By writing tests first, developers and teams enjoy heightened code reliability, easier maintenance, and a more agile approach to change. For anyone seeking to build dependable, adaptable software in today’s demanding environment, TDD remains a proven and invaluable ally.
Multi-Agent Output (2,324 tokens, 4.75/5 quality)
The Benefits of Test-Driven Development in Software Engineering
Imagine a world where most software bugs are caught before they ever reach your customers. For development teams, this promise is not just wishful thinking—it’s increasingly a reality, thanks to Test-Driven Development (TDD). As the software landscape grows ever more complex and the demand for reliability soars, TDD has emerged as a keystone practice among leading organizations. But what makes this methodology so transformative, and why are modern software teams embracing it in droves?
Introduction to Test-Driven Development
Test-Driven Development, commonly known as TDD, is a software engineering approach that flips the traditional development process on its head. Instead of writing code first and tests later (if at all), TDD mandates that developers begin by writing automated tests for each small unit of functionality. Only after the test is created—and fails, because the feature doesn’t exist yet—does the actual code get written and refined until the test passes. This “test-first” cycle repeats for every new requirement, embedding quality checks directly into the DNA of the software. As the digital industry faces rising pressure to deliver robust, maintainable systems rapidly, TDD’s appeal and adoption have grown significantly across startups and enterprises alike.
Key Benefits of TDD
Test-Driven Development isn’t just a shift in workflow—it’s a mindset that brings a wealth of concrete benefits to software teams. From higher code quality to a smoother development lifecycle, TDD delivers value at every stage.
Enhanced Code Quality & Reliability
Frequent, automated testing is the hallmark of TDD. Because each code segment is rigorously tested before it’s ever committed, defects and edge cases are caught early—long before software reaches production. Numerous studies affirm the impact: for example, IBM reported a 40% reduction in bug rates after rolling out TDD practices, while Microsoft teams experienced up to a 60% drop in post-release defects. By building quality into the process, TDD yields software that ships with greater stability and user trust.
Streamlined Debugging & Maintenance
With TDD, every new feature comes with its own suite of regression tests. These automated checks act as sentinels, immediately highlighting when a recent change might have inadvertently broken existing functionality. For developers, this means fewer late-stage surprises and significantly reduced time spent tracking down bugs. Teams can quickly pinpoint and resolve issues, leading to more predictable release cycles and dramatically lower maintenance overhead in the long run.
Superior Software Design
Another often-overlooked advantage of TDD is improved design. When developers write tests before code, they’re forced to clarify specifications and think deeply about how components should interact. This upfront rigor encourages modular, loosely coupled code structures that are easier to extend and adapt as requirements evolve. TDD naturally deters “big ball of mud” architectures and fosters cleaner interfaces, ensuring the application’s foundations are sound right from the start.
Living Documentation
In the world of agile, fast-moving teams, documentation often falls behind, leaving new developers scrambling to understand complex codebases. TDD’s automated tests double as executable documentation—actual, up-to-date scenarios that describe how code should behave. For onboarding, knowledge transfer, and cross-team communication, this “living documentation” eases the learning curve and helps safeguard institutional knowledge as projects scale or staff changes.
Facilitated Refactoring
Software must continuously evolve, and TDD makes that evolution safe and stress-free. When developers need to refactor—whether for optimization, code readability, or new requirements—having a comprehensive test suite ensures regressions are caught instantly. Refactoring becomes less of a risky endeavor and more an opportunity for improvement, empowering teams to iterate confidently and maintain code health over the project’s life.
Challenges and Limitations of TDD
Like any practice, TDD is not without its hurdles. One common concern is the perceived increase in initial development time. Writing tests before any implementation can slow progress at the outset, especially for teams new to the methodology. Additionally, there’s a learning curve; effective TDD requires developers to not only master testing frameworks but also recalibrate how they approach problem-solving.
In some domains, TDD’s benefits may be limited. For example, projects heavily reliant on rapid prototyping, UI experimentation, or integrations with legacy systems can encounter friction when writing tests upfront isn’t practical. Poorly written or overly rigid tests can further stunt progress, resulting in “test paralysis” where making changes becomes daunting.
Despite these challenges, many teams discover that the upfront investment pays exponential dividends as projects mature. By embracing TDD’s discipline, common pitfalls fade, especially when combined with coaching, pair programming, and incremental adoption strategies.
Real-World Results and Industry Examples
The real measure of TDD’s value lies in the outcome, and leading technology companies provide compelling evidence. A widely cited Microsoft case study revealed that teams practicing TDD recorded 60–90% fewer defects. Similarly, a group at IBM observed significant reductions in critical post-release bugs and noted improved responsiveness to changing business needs.
Industry surveys, such as those published by the IEEE and Agile Alliance, consistently find that TDD correlates with higher team morale, better predictability of software releases, and measurable long-term cost savings in maintenance. From small startups to tech giants, TDD has become a catalyst for quality and innovation, driving both customer satisfaction and operational efficiency.
Conclusion
Test-Driven Development isn’t just a passing trend—it’s a proven, transformative discipline that empowers software teams to deliver cleaner, more reliable code. By embedding automated quality checks into the heart of daily work, TDD reduces bugs, eases maintenance, and fosters smart design—all while creating living documentation for the future. For organizations ready to level up their software process, embracing TDD is an investment that pays off in quality, confidence, and long-term agility.
2. Single GPT-4.1 Agent vs 3 GPT-4o-mini Agents
Can a cheaper model with the right architecture match a premium model? This benchmark tests whether multi-agent prompt chaining with gpt-4o-mini can compete with a single gpt-4.1 agent.
Benchmark Configuration
Prompt: "The benefits of test-driven development in software engineering"
| Configuration | Model | Agents | Description |
|---|---|---|---|
single-agent | gpt-4.1 | 1 | CombinedContentAgent (premium model) |
multi-agent | gpt-4o-mini × 3 | 3 | Researcher → Outliner → Writer (budget model) |
Results Summary
| Benchmark | LLM Calls | Tokens | Latency | Word Count |
|---|---|---|---|---|
| single-agent (gpt-4.1) | 1 | 989 | 9.9s | ~600 |
| multi-agent (3× gpt-4o-mini) | 3 | 4,790 | 39.7s | ~1,800 |
Token Breakdown:
| Benchmark | Input Tokens | Output Tokens | Total |
|---|---|---|---|
| single-agent | 156 | 833 | 989 |
| multi-agent | 1,594 | 3,196 | 4,790 |
Quality Comparison
| Dimension | single-agent (gpt-4.1) | multi-agent (3× gpt-4o-mini) |
|---|---|---|
| Depth | Surface-level | Deep, comprehensive |
| Balance | Only benefits | Pros AND cons |
| Actionability | General advice | Best practices, frameworks |
| Credibility | No citations | Google, Microsoft, JUnit, NUnit |
| Completeness | Summary-level | Publication-ready |
| Word Count | ~600 | ~1,800 (3×) |
Key Findings
Multi-agent with cheaper models produces richer content:
- 3× more content with proportionally more detail
- Balanced perspective by acknowledging TDD limitations and when it’s not effective
- Actionable guidance with specific frameworks (JUnit, NUnit, Mocha) and best practices
- Real-world credibility with Google and Microsoft case studies
Single-agent with premium model:
- Correctly credits Kent Beck and Extreme Programming origins
- Good coverage of essentials but no specific tools or company examples
- No discussion of challenges or limitations
- Missing actionable implementation guidance
Key insight: Multi-agent architecture with budget models can outperform single premium models for content generation. The structured pipeline forces comprehensive coverage that a single call often misses.
Trade-offs
| Factor | single-agent (gpt-4.1) | multi-agent (3× gpt-4o-mini) |
|---|---|---|
| Cost | Lower tokens, higher $/token | Higher tokens, lower $/token |
| Latency | 9.9s | 39.7s (4×) |
| Quality | Summary-level | Publication-ready |
| Depth | Surface | Comprehensive |
Recommendation: For content where quality and depth matter, 3 cheap agents beat 1 expensive agent. For quick drafts, single premium agent is faster.
Generated Outputs
Single Agent Output (gpt-4.1) (~600 words)
The Benefits of Test-Driven Development in Software Engineering
In the ever-evolving landscape of software engineering, delivering reliable, maintainable, and high-quality code is paramount. Among the methodologies that have emerged to address these challenges, Test-Driven Development (TDD) stands out as a robust practice that not only enhances code quality but also streamlines the development process. Understanding the benefits of TDD can help software teams make informed choices in their workflow and ultimately drive more successful projects.
Understanding Test-Driven Development
Test-Driven Development is a software development approach in which tests for a new function or feature are written before the code itself. Pioneered by Kent Beck as part of Extreme Programming (XP), TDD follows a simple but powerful cycle: write a failing test, implement just enough code to make the test pass, and then refactor the code for improvement. This “red-green-refactor” loop underpins the TDD methodology and has far-reaching effects on the quality and maintainability of software.
Early Detection of Defects
One of the primary advantages of TDD is its ability to catch bugs at the earliest stages of development. By writing tests before any code is written, developers are compelled to consider potential edge cases and failure scenarios upfront. This proactive approach contrasts with traditional methods, where tests are often an afterthought. As a result, defects are detected and addressed almost as soon as they are introduced, significantly reducing the time and cost of later-stage debugging and bug-fixing.
Enhanced Code Quality and Design
TDD encourages small, incremental changes—each supported by a growing suite of automated tests. This incrementalism leads to more modular, loosely-coupled code, as developers must ensure that each component is independently testable. Such structural discipline naturally results in code that is easier to understand, maintain, and extend. Studies have shown that developers using TDD tend to produce code with higher cohesion and lower coupling, architectural traits strongly correlated with long-term software robustness.
Comprehensive Test Coverage
Test-driven development substantially increases test coverage. Since every functionality is preceded by a test, it becomes inherently more difficult for sections of code to go untested. This comprehensive coverage not only boosts quality assurance but offers immediate feedback if code changes introduce regressions. Furthermore, a reliable suite of tests gives developers confidence to refactor and enhance code without fear of inadvertently breaking existing behavior.
Improved Collaboration and Documentation
TDD facilitates collaboration among team members by promoting a shared understanding of requirements through tests. Tests explicitly define expected behaviors and edge cases, effectively serving as living documentation. When new developers join a project, well-written tests make it easier to grasp system functions and constraints, accelerating onboarding and reducing the risk of misunderstandings.
Accelerated Debugging and Reduced Maintenance Costs
While writing tests might initially seem to slow development, TDD often leads to faster progress over the course of a project. Automated tests serve as an immediate safety net, quickly highlighting issues and minimizing the need for manual debugging later on. Additionally, as codebases grow, maintenance becomes increasingly costly—TDD mitigates this by ensuring that changes are validated instantly, preventing the accrual of “technical debt” that can burden teams down the line.
Enabling Agile and Continuous Delivery
TDD is a natural fit for agile development methodologies and continuous integration/continuous deployment (CI/CD) pipelines. Having a robust suite of automated tests means that features can be confidently shipped more frequently, with a high degree of assurance that new code hasn’t broken existing functionality. This rapid feedback cycle is crucial in modern software delivery, where speed and reliability are competitive advantages.
Conclusion
Test-driven development is much more than just a technical practice—it is a mindset that transforms how software is designed, built, and maintained. By prioritizing early defect detection, enhancing code structure, ensuring comprehensive test coverage, and facilitating better documentation and collaboration, TDD equips teams to produce higher quality software with greater confidence and efficiency. As software systems continue to grow in complexity, embracing TDD can provide the foundation needed for sustainable and successful engineering in today’s fast-paced digital environment.
Multi-Agent Output (3× gpt-4o-mini) (~1,800 words)
The Benefits of Test-Driven Development in Software Engineering
Introduction
In an age where software reliability can make or break a business, how can developers ensure their code is robust and free of defects? Enter Test-Driven Development (TDD) – a methodology that promises not only to enhance code quality but also to accelerate the development process. With TDD, developers write tests before they write the corresponding code, fostering a mindset of quality from the outset. This article delves into the definition of TDD, its numerous benefits, potential challenges, and real-world applications, ultimately making a compelling case for integrating TDD into modern software engineering practices.
1. Definition of Test-Driven Development (TDD)
How TDD Works
Test-Driven Development is a software development approach that revolves around an iterative, structured process aimed at producing high-quality code. The fundamental premise of TDD is simple: before writing any functional code, developers first write tests for what the code is supposed to accomplish. This approach lays the groundwork for robust software as it requires developers to think critically about requirements and design issues beforehand.
The process starts with identifying a requirement or small piece of functionality. Developers write a test that outlines the expected behavior of this feature. The test will initially fail, as no corresponding code has been written yet—this is an expected part of the process. Next, developers write the minimum necessary code to make the test pass. Finally, they can refactor the code, improving its structure and readability while ensuring all tests still pass. This cyclical process encourages constant interaction between testing and development, enabling developers to catch errors early in the coding cycle.
The TDD Cycle
The TDD methodology follows a specific cycle often summarized as “red-green-refactor.” The cycle begins in the “red” phase, where tests are written to specify what the code should do, and they fail because the implementation is yet to exist. Moving to the “green” phase, developers write just enough code to pass these tests. Once all tests pass, the process transitions to the “refactor” phase, where the code is optimized for maintainability and performance, all while ensuring that tests continue to pass.
This cyclical nature of TDD not only ensures that code is reliable but also encourages cleaner, more efficient code practices. Each urban cycle reinforces the relationship between tests and functionality, ultimately leading to a more streamlined development process.
2. Benefits of TDD
Improved Code Quality
One of the most significant advantages of Test-Driven Development is the immediate boost in code quality. TDD fosters a mindset where developers must consider potential bugs and edge cases before writing the functional code. Since tests are written first, developers have a clear understanding of expected behavior, which reduces the likelihood of defects and logic errors.
The practice of constantly running tests while coding acts as a safety net that not only catches issues at an early stage but also promotes a culture of meticulous coding standards. As a result, TDD encourages developers to write clear, concise code that adheres to robust design principles—ultimately minimizing future maintenance costs and enhancing software longevity.
Increased Development Speed
At first glance, one might assume that writing extensive tests before coding would slow down the development process. However, numerous studies and anecdotal evidence suggest the opposite holds true. The practice of early testing often leads to quicker iterations as issues are identified and resolved earlier in the development cycle.
When developers adhere to TDD, they spend less time troubleshooting bugs during later stages of the project—issues that might have been discovered only during integration or testing phases. Consequently, this proactive approach reduces the time spent on regressions and last-minute fixes, accelerating overall development timelines and enhancing productivity.
Enhanced Design and Architecture
Another notable benefit of TDD is its positive effect on software design. Because tests explicitly define expected behaviors, developers are more inclined to create modular, maintainable code. This modular approach makes it easy to modify parts of the application without unintended side effects on other components.
Additionally, TDD encourages a more thoughtful approach to object-oriented design and promotes the Single Responsibility Principle, which states that a class should only have one reason to change. This results in a cleaner and clearer design, making it easier for teams to adapt to changing requirements and to onboard new developers into a project.
Better Collaboration and Communication
Test-Driven Development also facilitates better collaboration within development teams. Tests serve as living documentation that outlines the expected behavior of software components, bridging gaps in communication among team members. When new developers join a project, they can review the existing tests to gain insights into the code’s purpose and functionality.
Moreover, TDD supports an Agile development environment, where continuous feedback loops foster collaboration. Developers, testers, and stakeholders can engage in productive discussions around tests, clarifying requirements and ensuring that everyone is aligned on project goals.
3. Challenges and Considerations
Potential Drawbacks of TDD
While Test-Driven Development offers a host of benefits, it is not without its challenges. One commonly cited drawback is the initial time investment required to write tests before actual coding begins. This upfront effort can feel daunting, particularly for teams unaccustomed to rigorous testing practices.
Additionally, TDD may not be suitable for every type of project, especially those with rapidly changing requirements or those in very early stages of development where functionalities are still nebulous. The discipline required to adhere to TDD can also lead to friction among developers who prefer traditional coding methods.
Situations Where TDD Might Not Be Effective
There are specific scenarios and project types where TDD may not provide the expected benefits. For instance, in exploratory development where features are continually evolving based on user feedback, writing tests can become a burden rather than a boon. Similarly, for projects with very short lifecycles or prototypes that are not intended for long-term use, TDD may not make practical sense.
Furthermore, teams lacking experience with TDD may struggle to fully grasp the techniques required to write effective tests, potentially leading to poor test coverage or unreliable tests that do not add real value. In such cases, organizations may need to assess their readiness and willingness to adopt TDD before committing to it as a standard development approach.
4. TDD Practices and Tools
Common Frameworks in TDD
To facilitate Test-Driven Development, a variety of testing frameworks are available to support different programming languages and methodologies. Some of the most popular include JUnit for Java, NUnit for .NET applications, and Mocha for JavaScript testing. These frameworks provide a structured environment for creating, running, and managing tests, allowing developers to focus on writing quality code.
Choosing the right testing framework is crucial for effective TDD. A robust framework can streamline the testing process and integrate with development tools, providing an efficient environment for rapid feedback.
Best Practices for Implementing TDD
For teams looking to embrace Test-Driven Development, several best practices can enhance their TDD processes. Firstly, it is essential to start small, applying TDD to a limited set of features or components before scaling up to the entire codebase. This gradual approach enables teams to build confidence and experience with the methodology.
Additionally, tests should be clear and descriptive, effectively communicating the purpose of the code they are validating. Implementing a “one test, one functionality” rule can help maintain focus. Finally, incorporating regular code reviews and continuous integration can further strengthen the TDD process, ensuring that tests remain relevant and up-to-date as the code evolves.
5. Case Studies and Real-World Examples
Successful Implementations of TDD
Numerous leading software companies have successfully integrated Test-Driven Development into their development processes, paving the way for measurable improvements in code quality and team productivity. For instance, Google employs TDD across several of its engineering teams, allowing them to maintain high standards of reliability, even as they rapidly innovate.
Microsoft has also endorsed TDD within many of its product teams, recognizing the value of early testing in reducing the number of bugs that make it to production. By prioritizing TDD, these organizations have not only improved their software quality but also enhanced their developers’ skills and confidence.
Impact on Software Projects
The impact of TDD on software projects can be profound, leading to significant improvements in development performance. Companies that have adopted TDD report lower defect rates, quicker turnaround times, and enhanced team morale. Furthermore, the minor initial investment in test writing often pays off, with projects yielding fewer late-stage discoveries and a smoother path to deployment.
Statistics reveal that teams utilizing TDD can expect a notable drop in production bugs, as well as increased customer satisfaction due to software reliability. Ultimately, the positive implications of TDD ripple through not just the development team but the entire organization, enabling a culture of quality-focused engineering.
Conclusion
While adopting Test-Driven Development may pose challenges, the substantial benefits it offers in terms of code quality, speed, and team communication can lead to transformative outcomes in software engineering projects. The TDD methodology fosters a proactive approach to development, encouraging teams to build better software while reducing the risks associated with bugs and design flaws.
For teams looking to improve their development practices, TDD presents a compelling option worth exploring. By embracing TDD, developers can enhance their skills, collaborate more effectively, and ultimately deliver software that meets—or exceeds—customer expectations. As the landscape of software development continues to evolve, integrating Test-Driven Development could well be a key strategy for success.
3. Running Locally with Ollama (llama3.2)
Want to run everything locally without API costs? The patterns repo includes a multi-agent-local benchmark using Ollama:
[BenchmarkLlm("multi-agent-local", Description = "3-agent pipeline (Ollama)")]
public async Task<BenchmarkOutput> MultiAgentOllama(string prompt)
{
    var (workflow, agentModels) = MultiAgentContentPipeline.Create(
        new MultiAgentContentPipelineConfig
        {
            Provider = "ollama",
            ResearcherModel = "llama3.2",
            OutlinerModel = "llama3.2",
            WriterModel = "llama3.2",
        }
    );

    var content = await WorkflowRunner.RunAsync(workflow, prompt);
    return BenchmarkOutput.WithModels(content, agentModels);
}
Cloud vs Local Comparison
| Benchmark | Model | Words | Tokens | Latency | Quality |
|---|---|---|---|---|---|
| single-agent (baseline) | gpt-4.1 | 681 | 1,082 | 30s | 3.6/5 |
| multi-agent | gpt-4.1 | 1,433 | 4,506 | 27s | 4.4/5 |
| multi-agent-local | llama3.2 | 507 | 2,945 | 138s | 3.2/5 |
Quality Breakdown
| Dimension | single-agent | multi-agent | multi-agent-local |
|---|---|---|---|
| Completeness | 4 | 4 | 4 |
| Structure | 5 | 5 | 4 |
| Accuracy | 5 | 5 | 4 |
| Engagement | 4 | 4 | 3 |
| Evidence | 3 | 4 | 3 |
| Balance | 2 | 5 | 2 |
| Actionability | 2 | 4 | 3 |
| Depth | 4 | 4 | 3 |
Analysis
Multi-agent (gpt-4.1) delivers the best overall quality:
- +110% more words with richer, comprehensive content
- Balance score of 5 vs 2—covers both pros AND cons
- Cites specific research (Microsoft, 40-60% defect reduction)
- Engaging narrative with depth
Multi-agent-local (Ollama llama3.2) strengths:
- Runs entirely offline, no API costs
- Concise and practical with best practices
- Includes references to research and major tech companies
Multi-agent-local weaknesses:
- Slower (138s vs 27s)—local hardware matters
- Superficial analysis compared to cloud models
- Heavy reliance on bulleted lists, less narrative flow
When to use local models:
- Development and testing (save API costs)
- Privacy-sensitive applications
- Offline environments
- Learning and experimentation
The quality gap (3.2 vs 4.4) shows where local models are still catching up, but llama3.2 produces usable content for many use cases.
Code Details
Running Benchmarks Yourself
The patterns repo includes a benchmarking framework. Try it yourself:
cd patterns/01-prompt-chaining/src/PromptChaining

# List available benchmarks
dotnet run -- --list-benchmarks

# Run all benchmarks
dotnet run -- --benchmark

# Evaluate a previous run
dotnet run -- --evaluate ./runs/<run-id>
Benchmark results are saved to the runs/ directory with:
output.md- Generated content from each approachcomparison.md- Side-by-side metricsevaluation.md- LLM-as-Judge quality scores
Understanding Agent Instructions
The quality of your prompt chain depends heavily on the instructions you give each agent. Key principles:
- Be specific: Tell the agent exactly what to do and what format to use
- Define the output: Specify the structure of the expected response
- Set context: Each agent receives the previous agent’s output as context
- Control output: The final agent should output ONLY the final result, not intermediate steps
The WorkflowBuilder Pattern
WorkflowBuilder creates a directed graph of agents:
new WorkflowBuilder(startAgent)
    .AddEdge(agent1, agent2)  // agent1's output → agent2's input
    .AddEdge(agent2, agent3)  // agent2's output → agent3's input
    .Build()
For simple sequential chains, you can also use AgentWorkflowBuilder.BuildSequential().
AgentExecutor
The AgentExecutor wraps an AgentConfig to create workflow-compatible agents:
- Supports multiple providers: Ollama, OpenAI, Azure OpenAI, OpenRouter, GitHub Models
- Uses
ChatClientFactoryinternally to create the underlying chat client - Handles message passing between workflow steps
- Enables OpenTelemetry metrics collection automatically
Common Pitfalls
1. Instructions Too Vague
Problem: Agent produces inconsistent or unexpected output.
❌ “Process this input”
✅ “Analyze the input, identify 3-5 key themes, and list supporting evidence for each”
2. Token Limits
Problem: Long chains accumulate tokens, hitting context limits.
Solution: For very long pipelines, consider summarizing between steps or using smaller intermediate outputs.
3. Leaking Intermediate Steps
Problem: Final output includes research notes or outline.
Solution: Explicitly instruct the final agent: “Output ONLY the final article. Do not include research notes, outline, or any previous context.”
Summary
What You Learned
- Create specialized agents with focused instructions
- Chain agents using
WorkflowBuilder - Compare multi-agent vs single-agent approaches
- Run benchmarks with cloud and local providers
Key Insights
- Multi-agent prompt chaining produces +31% higher quality with better evidence and balance
- The trade-off: 3.7× more tokens for significantly richer content
- 3 cheap agents (gpt-4o-mini) can outperform 1 expensive agent (gpt-4.1)
Try It Yourself
- Add an Editor Agent: Extend the pipeline with a fourth agent for grammar and tone review
- Cost Optimization: Use cheaper models for Researcher/Outliner, premium for Writer
- Run Benchmarks: Compare quality scores across different model combinations
Next Steps
- Pattern 2: Tool Use - Agents calling external functions and APIs
- Pattern 3: Routing - Conditional paths based on input
- Pattern 4: Model Context Protocol - Connect agents to external tools via MCP
Resources
Found this helpful?
Comments